
CAD (Drawing Assisted by PC) applied to the marquetry
This page is presentation and as popularization and wants dress general : no name of tool, nor menu appropriate for a tool.
1 - Traditional drawing
In marquetry, whatever is the used method, there are several constraints bound to the drawing:
- The realization itself, traditionally hand-made on some paper or
more often on a tracing paper, in the mecanical pencil, with the
limitation which we know (0,5 mm for mines) or about the finest
possible rotring, and perpetual luxury gum!
Let us remind that the usually used blades have a "way" situated between 0,25
and 0,35 mm !
- The modification of this drawing, so having finished
him(it), we consider it necessary, or we wish to move one of the plans.
Then we erase, what is not always appropriate(clean), and can cause still
ambiguities during the division. On the copy (rice paper), the modifications of
the ink become opaque.
- The increases and the reductions, the
movements and the reproductions of the same motive, in the identical, or in a
various symmetry, the drawing of perfect curves, examples of ellipses
- The
reproduction of the editions of the drawing, (in the method element by
element) in 5, 10, or more scrupulously identical copies, even the
later(posterior) reproduction, when it misses!
- The thickness of the
line(feature) of cut, milked which increases if we enlarge our drawing by
means of photocopier, (from A4 to A3, the report is 1,4 thus the line(feature)
passes from 0,5 mm to 0,7 mm)
- The impression(printing) of the drawing
back to front which turns out useful in two cases: we want to use a copy to
realize a joining(assembly) back to front (classical author(classic) on tense
hold), or we wish to invert a boss on our wood, for example because the
sense(direction) lends itself better to the available veneer.
- The
coloring and the shades are generally realized on one of the
editions, in the pencil, the gouache, the watercolour, the pastel,
- The
filing of drawings and our fragile copies in the water in a box of the same
name, are afraid of the humidity and of the other bad weather; and we are never shielded from a some damage !
2 - Interest of a tool of drawing for the marquetry

Precision of the line(feature) printed in 1/10 eme of mm.
To use a tool of CAD allows to resolve at one go all these
small troubles.
Naturally, it is necessary to be equipped with the tool,
and to take time to put a lot there. Naturally, it is necessary to draw
everything with the tool, but when we are ground, more regret! Cause :
- The propelling pencil is replaced by the tool settled(adjusted) in 1/10
eme of mm in printing (on a
good printer), independently of the increase of the drawing in printing.
Where from precision during the division, thus in
the joining,
- To draw is facilitated (notably all which is
curved, with little usually, I conceive it !) by the tools of drawing, and
never the not closed objects which make us dig the head during the sawing.
- The modifications, the movements, the increases of
objects, reproductions of identical motives raise no more problem, and leave no
track of the previous pencil, the movement of the various plans either by
the system of copies, and the inverted printing is very
simple,
- To colour to anticipate the colours of wood is elementary by
the use of palettes, an edition can supply gradations of grey for the
forecast of the burnishing. We also have the possibility of modifying
easily a colour if printing does not satisfy after paper
edition.
- It is naturally possible to realize quite typical of
faking, voluntary deformations,
- It is possible to make of the
large-scale zoom, and thus to draw with bigger precision.
- Finally,
it is sometimes possible to add lines of cutting for a
bigger drawing than the printer allows it.
3 - Notions of copies

Example of assembly which is going to serve as main import: cliffs were added to the initial photo.
It is possible to work directly its drawing, as we would make it
for the pencil or for the feather.
We can also import a basic drawing,
or several drawings to realize a composition : sketch in the pencil scanned,
photo, painting... Then, it is necessary to adapt the size of the drawing
to the final printing notably in the direction portrait /
landscape.
Copies allow to draw all the plans, what brings of
the flexibility then, to modify the dimension of objects, their place and as a
consequence, their position some with regard to the others (above, below), and
their possible reproduction in another work.
- In printing, we can choose only copies to be printed. We shall thus eliminate all which is
not useful for the cut of the marquetry : for example, the images having been
imported.
- A first copy situated above the others gives the global
outline of the work, and is realized in more thick line (3 / 10 emes for
example). The inside of the frame is transparent to allow to see the following
ones. This outline helps to bound the other copies.
- The order of the
plans is important, and it is necessary to watch the superimposing sensible,
because a plan among which drawings or forms are opaque prevents the
vision of a copy which is down ! Logic, they are transparent copies ! It is always
possible to switch around two copies to obtain the deliberate effect.
-
Often, two options allow the display or not of every copy,
as well as their locking.
- With the appropriate tools, we draw the
bottom on a new copy that our import. The forms are either coloured in
white, or in real colour. It is generally possible to print only the
lines without colours, and this avoids managing 2 different drawings
and their modifications: a Black & White one, and
colored one .
- The black outlines are realized in 1 / 10eme of
mm.
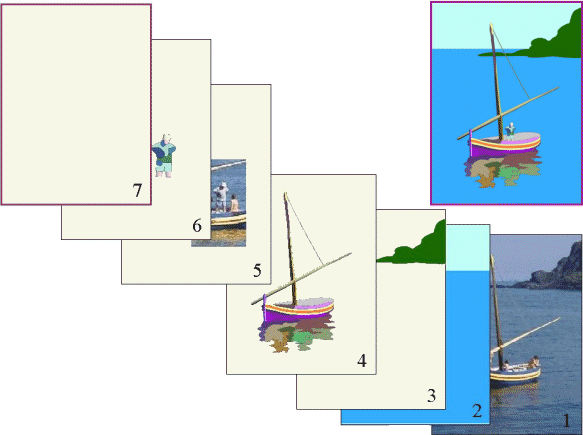
To realize this drawing, a first assembly of import is used
(copy 1); the copy 7 placed above the pile gives the dimension of the final
picture(table). Then the copy 2 is realized for the drawing of the bottom, 3
that of the cliffs, and for this operation, copy 2 was for a moment hidden; then
on the copy 4 one drawn the boat and its reflection in the water, where were
darkened copies 2 and 3. A new import is realized on another copy 5, which was
of use to the drawing of the person, trace 6. The obtained result is the
combination of copies 7, 6, 4, 3 and 2.
Note: for the
understanding, copies are shown voluntarily opaque.
4 - Drawings of curves
The drawing with hand (with mouse) is difficult. Prefer curves said
"Besier". With little usually, we draw
everything, and especially one can modify, add or kill anchorage
point, curves of lines, as well as their depth...
Also, we can very
easily modify the size of objects, their place, their colour, realize identical
objects by simple copy,


In the first drawing, we see the anchorage points of the first 2 curves, and the 3eme shows the directional lines. During the drawing, more we "pull" more the curve is deep, and at the same time, stopping of the mouse defines the shape of the curve. In the second drawing, the shape was closed, and we see the lines of direction of the last curve.


The first drawing indicates a modification of a curve by acting on the directional lines, the second synthetizes the complete shape, what allows an action at the level of this whole shape: modification height, width, 2 at the same time, a symmetry, reversal, coloring,
5 - Notions of forms
Other important notion: the opaqueness of the forms, and the order of superimposing of objects.
The forms are either opaque, or transparent; to draw, it is preferable that a shape is transparent, to allow to follow the motive. But then, we can make her(it) opaque for the printing; the reason is that we are not obliged to draw everything: if we draw a complex shape, we shall draw it only once to avoid going back on the same line, what is often source of confusion, for the piece which is down. It is then important to place this 2eme piece UNDER the 1st.
Sometimes, it is the opposite for isolated elements, and we have to place the last piece drawn ON the previous one.

In this example, the yellow shape was completely drawn. As the orange-coloured shape is under the previous one, so it was drawn only for its bottom. The top part is hidden by the yellow.
6 - Facilitated, retouch
With this principle, it becomes simple to retouch one or several plans to modify the balance of the set, as shows in the final drawing.

Final drawing: retouch of plans 2 and 3 for better balancing, increase of boat and repositioning of person

 Return Gallery 1
 Return Tools page
 Return Element by element
 Return Home page