
10 ESSENTIAL
PHASES
METHOD KNOWN AS "ELEMENT BY ELEMENT" or "TRADITIONAL METHOD"
or by
separate packages
PHASE 1 - DRAWING REALIZATION :


After
composition, the drawing is prepared on a final scale.
It is possible to add
the legend of wood to be used, to make a preliminary draft, to number the
pieces, to divide into storage areas (for great work), and to add the
preparation of the ranges which will be carried out by browning.
A tool of
CAD (drawing assisted by PC) can be of a great help. This kind of tool amongst
other things makes it possible to draw fine lines (1/10 eme mm)
See composition's animation.  See CAD applied to marquetry animation.

PHASE
2 - PAPER CUTTING OF :


After realization of copies of
the plan, it is necessary to carry out cutting paper coin by coin. The
reason for which it is necessary to use several copies is that, on only one
drawing, one cannot have the patterns of each element, with the margin of the
saw line.
PHASE 3 - WOOD PREPARATION :


For use, it is necessary to level
wood, to repair the delicate parts, to ensure of it rigidity by superposition
and use of laminates. Plating can be manufactured by sawing, cutting or
unwinding; according to the manufacturing method, it has a thickness from 0,5 to
1 mm, sometimes more.
PHASE 4 - CHOICE OF THE VENEERS :

 One finds "veneers" very coloured:
To represent the foliages, the paving stones,
the walls, one can use "magnifying glasses", "brambles", flecked woods... In
the choice, one must hold account of the finished aspect, as well as future
ageing of wood. Paper is then stuck on selected plating.
One finds "veneers" very coloured:
To represent the foliages, the paving stones,
the walls, one can use "magnifying glasses", "brambles", flecked woods... In
the choice, one must hold account of the finished aspect, as well as future
ageing of wood. Paper is then stuck on selected plating.
See :
MATTER

PHASE 5 - CUTTING WITH SAW:


Wood is then
cut out with the saw. In order to allow the cutting of the curved parts, the blade
used has a "way" (thickness) of 0,34 mm, that is to say 1/3 of mm : blades
Pebecco n° 3. As any craftsman of wood knows it, the direction of fibres of
material is very important, because wood is much more breakable with
"against-wire".


 Pieces are then placed in tablets, waiting the total end of cutting before assembly.
Photographs and details of the machine Julia 2.

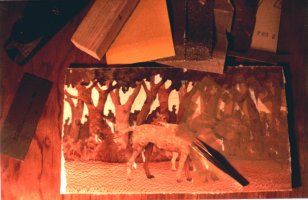
PHASE 6 - BROWNING WITH SAND :


If one wishes to
obtain a gradation, the parts are plunged in hot sand. Long and delicate operation,
because one needs shade without burning. Temperature of sand, duration, depth, type and thickness of wood are as many parameters which must be taken
into account.


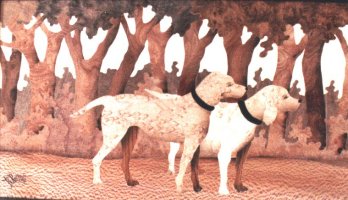
One can judge
possibilities of browning on the swans and water.
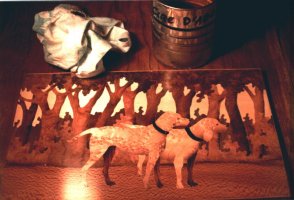
PHASE 7 - ASSEMBLY :


The parts are laid out in shelves. Then carry out a provisional
maintain of the parts using hot glue ; this operation is made on one of
scale, which makes it possible to work on the place and
by giving a good positioning of the parts; this operation is made on the back of work, in order to have a final work rights.
This practice offers the advantage of the solid maintenance of the pieces of wood which one sticks to one; it
facilitates also the takeoff of paper after joining under press, which is removed easily by wetting it.


Note (another method) : Another technique lies in the use of adhesive paper : Each piece of venner is maintained with some drawing pins, while assembling. This method less professional permits to change easily pieces not correct that can be done again, or cutted y the window method.
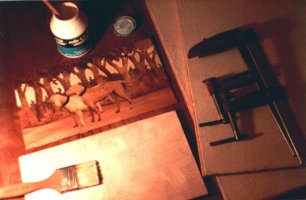
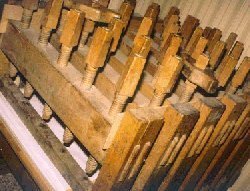
PHASE 8 - JOINING UNDER PRESS:


Marquetry thus finished is stuck on
its support using press; these presses are generally produced using several
"frames". The adhesive is placed at the back of the panel, or better
directly on the support. Use of work depends the choice on the adhesive :
Neoprene, vinyl, hot adhesive....
Note: The cabinetmakers use the hot
adhesive which allows a takeoff of marquetry to allow a future restoration ;
for example, if marquetry is scaled or if the piece of furniture worked.
To press curved drawers, boxes rounded...
modern technology enables us to use vacuum presses, made up of a solid plastic
pocket and a vacuum pump of air. See Tools page
PHASE 9 - SCRAPING, SANDPAPERING:
Sticking paper is removed onthe
place. This must be done very delicately not to tear off wood most fragile.
Then work is sandpapered after scraping with the scraper, whose technique of
sharpening is not always easy.
It is necessary to use fine sandpaper,
then to finish by a glossing to eliminate the residues from dust.

PHASE 10 -
COMPLETIONS :

 The details can be carried out in
pyrogravure.
The details can be carried out in
pyrogravure.
According to the use, one can apply a varnish to the plug, one
filled-beeswax, or a simple completion containing beeswax. It is this technique
which I practise for the pictures, because I find that it does not hide the errors
as can do it a varnish, and leaves the possibility of the "touch"
According to this method, it is
possible to carry out landscapes, portraits, scenes, complex florets and this
starting from a quantity of varied veneers ; this with a decorative aim,
tables, objects, furniture...
One can also represent reasons known as
"misleads the eye" which give the illusion of the perspective.
Lastly, an
alternative described by Yves le Chevalier is here illustrated:

The method consists in using pure latex to stick various phases : the reason
on plating to be cut out, a strong paperboard for protection under this plating,
before cutting, and the assembly of the parts cut out on a specimen of the
reason.
The goal of this process is to allow: an easy
repositioning of the pieces, the very simple removal of papers,
paperboards... at the time of the following phases.
The hot adhesive is
used to consolidate plating on kraft and the vinyl adhesive with final joining
on the support.
The latex is presented in liquid form out of pot, and thus is
used with the brush, knowing that the product evaporate quickly, and the brush
must be cleaned with a suitable thinner.
